Camcorder Error Message – How to avoid it!
How to Avoid Camcorder Error Message
Camcorder Error message, not accepting -, or ejecting-, chewing tapes, line bars and pixelation during playback – Sounds familiar? Do you want to know why these issues occur and how to avoid them? During my work as a camera technician I have repaired thousands of camcorders and other video equipment, from VHS and Betacam in the early days to Digital8 and mini-DV.
The latter format, mini-DV, delivers by far the best picture, but there is a downside…
In my experience it is the most sensitive tape format to different tape surfaces and damaged tape cassettes.
Let me explain a Camcorder Error Message
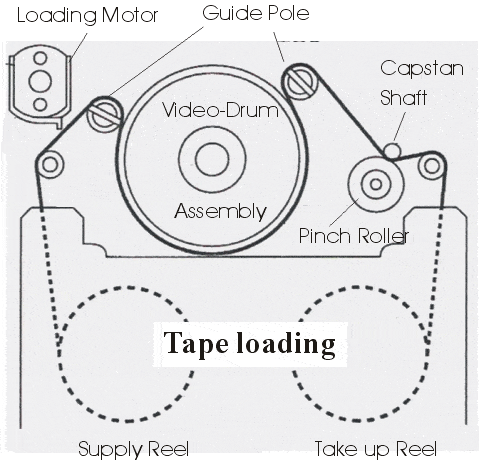
due to the high data volume on a physical small tape, the tape path and transport in the tape mechanism of the camcorder has to be very precise. Tolerances in tape path alignment and tape tension in the beginning and end of the cassette need to be very accurate. Sensors inside the recorder mechanism control tape tension, transport speed, and video head drum speed at all times. Even if the tape loading and unloading is slightly delayed, for whatever reason, the computer of the control logic shuts down the whole camera and displays an error message to prevent any damage to the tape or camcorder. A fingerprint on the tape can cause enough friction to slow down the video head drum, that the servo circuit cannot compensate and the system control shuts down the camera.
In theory as well as in real live it is very likely that a damaged tape inserted in a newly repaired camcorder can cause malfunction or any of the other symptoms described above. Usually the damage is not as bad as in the first place when the tape got damaged by the faulty camera, but it is recommended, to get the camcorder checked out first, before you try a different or new tape. For more details of what you can do in this case, click Camera trouble shooting.
It goes even so far, that some camcorder models are sensitive to mixing different tape brands, as the residue of some tape material doesn’t mix well with others, or the tape tension and friction upsets the tape mechanism in the camcorder. This particularly applies to mini DV tapes with playing times of 120min or more.
Repairs of a damaged Mini DV tape – As you can imagine now, this can be a tricky subject.
- If there is any damage to the cassette housing, it is recommended to find an old mini DV tape, which has a cassette compartment hold together by screws and replace the whole housing without touching the tape with your fingers.
- Splicing the tape itself, is a very delicate work and should be done by a professional, as the joint itself, if not done properly, can damage the video heads. The loss of the damaged tape, which has been cut out is usually insignificant, as a few centimetres of tape represent only a few seconds of video footage.
- Once a spliced tape is successfully repaired, I still recommend to use it only once or twice to avoid any damage to the video head.
Summary, conclusion and recommendations
- Try to use the same brand of tapes only
- Avoid to use tapes longer than 90min
- Discard damaged tapes
- Be careful with head cleaning tapes – see video / article…
For more technical details about Camcorder Error Messages including tape- DVD- HDD and flash memory I recommend...
 Online Repair Estimate

 Facebook
 LinkedIn