by admin | Feb 18, 2011 | DIY Repairs
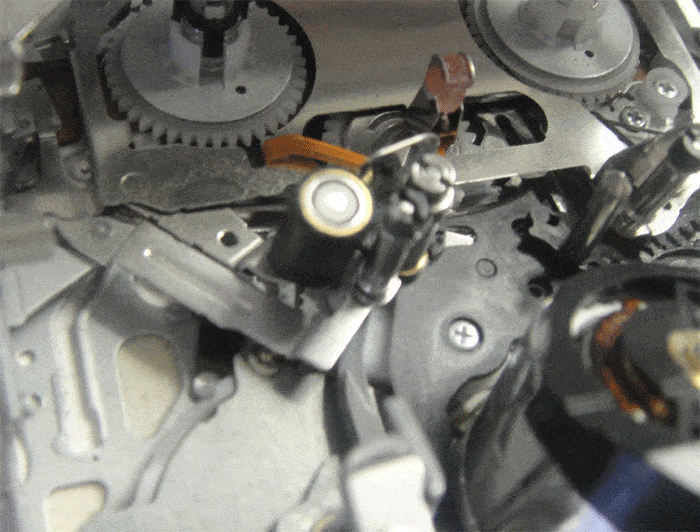
Pinch Roller Replacement Procedure
Symptom: Won’t accept tapes, error message. The pinch roller fell off the shaft and is missing or floating around in the tape mechanism.
Caution: The roller needs to be secured with a little plastic bit.
For this camcorder repair you just have to remove the cassette cover. There is no need to dismantle the camera.
Camera Repair - Pinch Roller Replacement
- Open the cassette carriage, remove the tape and leave it in eject position.
- Disconnect power/battery
- Remove cassette door
- Turn the camera around and shake it carefully to see if any parts fall out.
- Slide the old or new pinch roller over the shaft.
- Secure it with the little plastic bit as shown in image.
- If the plastic bit is to loose, secure it with a little drop of nail polish.
- Refit the door and test camera.
- Done!
Pinch roller fitted in chassis

Pinch roller and plastic piece
To avoid any damage and self induced faults, check out our Camera Care Video.
For more technical knowledge about camcorders I recommend THE Camcorder Handbook, or the Camcorder Technology Course
If your camera fault is not listed or you need advice with your particular camera issue click on the logo below.
For free repair estimates

- Fast Free workshop Estimate
- Australia–wide send in service
- ALL BRANDS, Video & Photo
- Professional & Domestic equipment
- Very competitive rates
- 6 month warranty on repairs
- 24/7 online job tracking
- Technician advice
by admin | Feb 18, 2011 | DIY Repairs
Side Screen Hinge Replacement Procedure
Symptom for Side Screen Hinge Replacement: Side screen no picture or lines. The picture in eye is viewer OK.
Caution: Test all functions in record and playback to see if there is further damage to the camera, which would make a repair uneconomically.
Camera Repair - Side Screen Hinge Replacement
- Dismantle the camera as far as you need to, to remove the whole side cover, which supports the Flip-out screen.
- Disconnect the flexible circuit board, which leads to the hinge unit.
- Unscrew and open the side screen itself.
- Undo the flexible circuit board and screws which hold the side screen and remove it from the hinge.
- Unscrew the hinge from the side case and replace it with the new one.
- Connect both ends of the flexible circuit board and refit the side screen.
- Complete to assemble the camera.
- Test all functions – Done!

LCD Hinge Assembly
Side Case and Hinge
If your camera fault is not listed or you need advice with your particular camera issue click on the logo below.
For free repair estimates
- Fast Free workshop Estimate
- Australia–wide send in service
- ALL BRANDS, Video & Photo
- Professional & Domestic equipment
- Very competitive rates
- 6 month warranty on repairs
- 24/7 online job tracking
- Technician advice
by admin | Feb 15, 2011 | DIY Repairs
Symptom: No playback picture, grey or blue screen. Three to five wide horizontal lines across the whole screen, or pixilation in playback.
Alignment/adjustment check: Check playback picture and audio with a pre-recorded tape and do own recording in LP and SP.
Caution: Tape-path check and alignment after the video drum has been replaced.
Camcorder Video Head Replacement and Camera Repair
- The camera needs to be dismantled to remove the whole recorder mechanism. Disconnect all cables and flexible circuit boards from the mechanism to the circuit board before unscrewing and removing the tape drive.
- Drive the upper chassis in fully eject position with an external variable power supply.
- Unscrew the three screws which hold the video drum assy and remove it.
- Place and screw the new video heads onto the chassis.
- Connect the chassis to the circuit board and refit the board.
- If the camera has tape path alignment holes in the outside housing, you can continue to assemble the whole camera for testing and tape-path alignment.
- If not you have to assemble the camera partly to a point where you can switch it on, load a pre-recorded reference tape, put the camera in playback mode and have access to the front of the mechanism where you can perform the tape path alignment.
- Use an oscilloscope and back tension tape if you have one.
- If not align the camera for perfect playback picture and sound! Don’t forget to check CUE and REW.
- Once the camera is assembled, check all functions in record and playback again.

If your camera fault is not listed or you need advice with your particular camera issue go here.
For Camcorder Video Head Replacement and Free Camera Repair Estimates - click below

- Fast Free workshop Estimate
- Australia–wide send in service
- ALL BRANDS, Video & Photo
- Professional & Domestic equipment
- Very competitive rates
- 6 month warranty on repairs
- 24/7 online job tracking
- Technician advice
by admin | Feb 15, 2011 | DIY Repairs
Symptom for mode switch replacement: Cassette compartment doesn’t close without cassette, sliding chassis goes down and automatically up again without cassette, error message.
Caution: Make sure there is no other obvious damage to the cassette carriage or sliding chassis. Use a variable low voltage power supply to drive the loading motor.
Camcorder Mode Switch Replacement Procedure
Note: Alignment/adjustment check: Mark the position of the rotor.
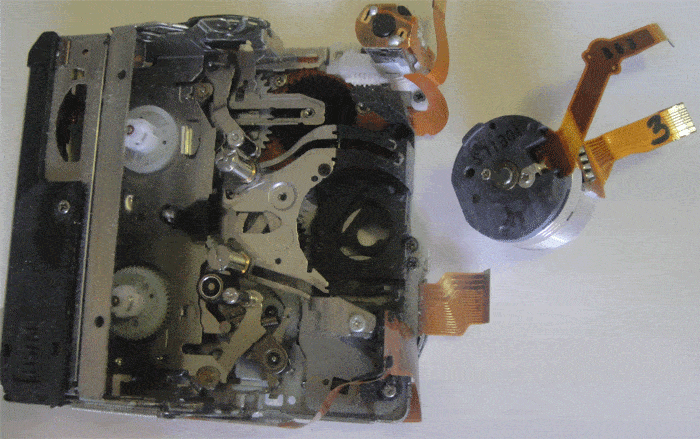
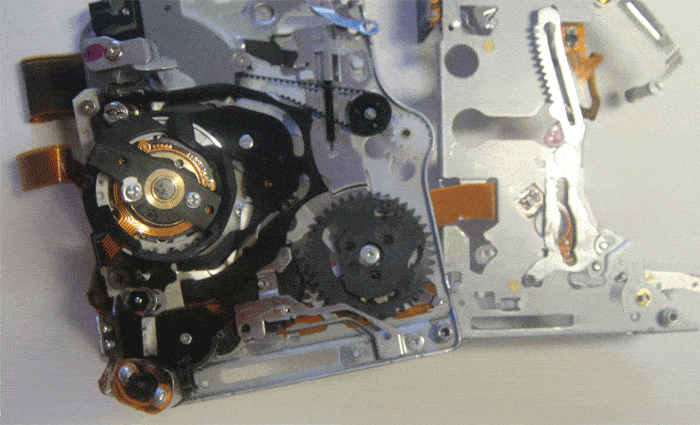
The whole tape mechanism removed.
- The camera needs to be dismantled to remove the whole recorder mechanism. Disconnect all cables and flexible circuit boards from the mechanism to the circuit board before unscrewing and removing the tape drive.
- Drive the sliding chassis into the eject position by using your power supply.
- Remove components around the mode selector switch assembly.
- Take photos along the way for later reference.
- Mark the rotor position of the switch with a felt pen before replacement.
- After fitting and reassembly of the chassis, use the power supply and drive the loading motor several times into eject and playback position. Make sure back tension arm and pressure roller engages properly when it suppose to.
- Once the chassis mechanically loads and unloads properly, you can start assembling the camera by refitting all cables and flexible circuit boards from and to the chassis.
- Assemble whole camcorder in reverse order.
- Once the mode switch replacement is completed and the camera is assembled, check all functions in record and playback again.
Mode switch placement in chassis

Camcorder tape drive mode switch
If your camera fault is not listed or you need advice with your particular camera issue click on the logo below.
For free repair estimates
- Fast Free workshop Estimate
- Australia–wide send in service
- ALL BRANDS, Video & Photo
- Professional & Domestic equipment
- Very competitive rates
- 6 month warranty on repairs
- 24/7 online job tracking
- Technician advice


 Online Repair Estimate

 Facebook
 LinkedIn