by admin | Apr 4, 2012 | Videos Tips & Tricks
How to save on camera repair! - Learn how to keep your camera serviced and clean

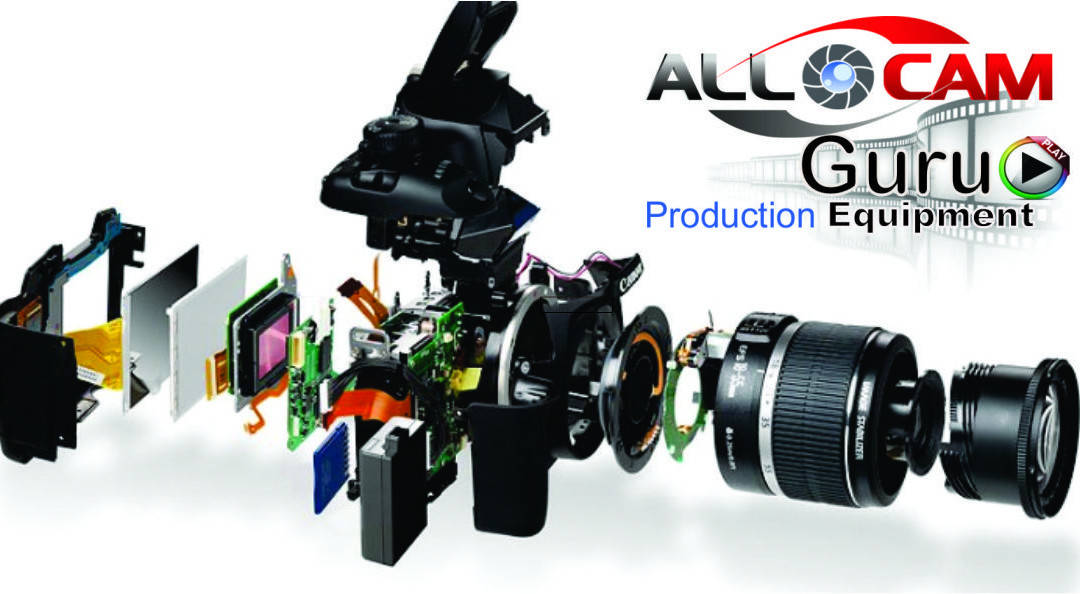
During my more than 25 years of experience as a camera technician I have seen hundreds of faulty cameras and camcorders which were damaged by self induced faults. Recently I produced a video and booklet, which outlines exactly the ‘Do’s and Don’ts’ of video camera handling and maintenance.
You can learn how to take care of your own camcorder and camera, and avoid up to 70% of repairs with the help of ALL-CAM’s DIY Camera Care & Protection video.
- You don’t have to accept camera repairs as a common expense.
- What is the point of having the right intention to take care of your camera equipment if you don’t know how?
- Sometimes it is a little more than just common sense.
- What about just the one piece of advice, which can make all the difference between no repair, repair or write off!
Learn how to prevent damage and how to spot a quality second-hand purchase. By keeping your camera in top condition, you will experience much less down time and have a better filming experience.
An investment, which potentially can save you hundreds of dollars on repair bills!
by admin | Feb 22, 2011 | DIY Repairs
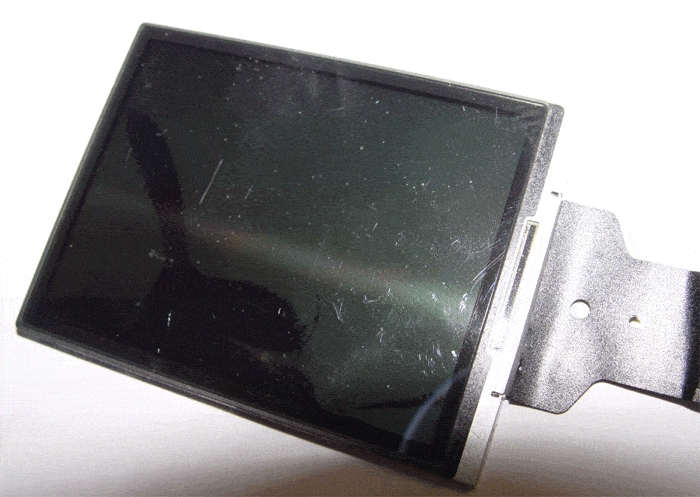
LCD Screen Replacement explained
The LCD display consist of a thin glass layer which is often directly exposed at the back of the camera housing.
Symptom: Crack in the glass and distorted display. A dark screen can be caused by a faulty back light unit or some other electronic issue.
Important: Test all other functions of the camera by connecting it via the A/V cable to a TV monitor. If you find some other faults with the camera, it might be questionable if it is worthwhile to proceed with the LCD replacement.
LCD Screen Replacement:
The disassembling procedure is often unique to a particular model. Some are more easier or difficult than others. However, after you have undone the screws, a back and front housing part can be separated. Once the back cover is removed, you may have to remove a circuit board to gain access to the connector which holds the LCD flexible circuit board. Unclip and remove the LCD.
In most cases the new LCD screen comes separate from the back light unit. In this case I would like to advice to work with a fibre cloth to keep the back light unit and the new LCD display clean during disassemble and assemble procedure. Make sure you remove all fingerprints, dust and dirt, as it will be visible once the screen lights up.
Assemble the camera and you are done.
General advice
Don’t be tempted to use any shortcuts during the disassemble procedure to access to remove the faulty component for repair or replacement. Go as far as you need to comfortably gain access to the faulty part. If not you may accidently pull of cables or tare flexible circuit boards. Pay particular attention to the release of circuit board connectors, some of them easily snap off.
If your camera fault is not listed or you need advice with your particular camera issue go camera repairs for a free estimate.

AllCam Camera Repairs
- Fast Free workshop Estimate
- Australia–wide send in service
- ALL BRANDS, Video & Photo
- Professional & Domestic equipment
- Very competitive rates
- 6 month warranty on repairs
- 24/7 online job tracking
- Technician advice
by admin | Feb 22, 2011 | DIY Repairs
Symptom for Lens Repair: Lens shutter doesn’t open and/or lens doesn’t extend or retract. In addition the display shows an error message and the camera makes a beep noise.
Caution: This repair applies only to sand and dirt damaged cameras. Impact damaged cameras usually require a whole lens replacement, which is most likely an uneconomical repair.
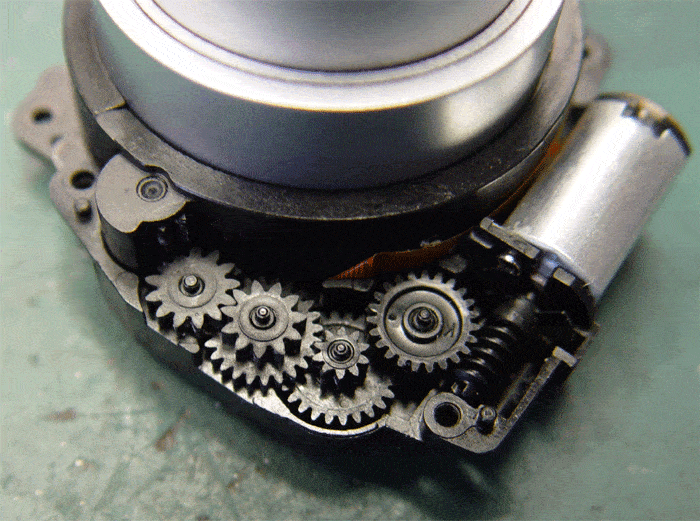
In most cases it is sand grains and dirt inside the gearbox, which drives the lens segments in and out. In order to clean the lens and gearbox the whole lens assembly needs to be pulled out of the camera.
To drive the lens motor manually, we use a variable power supply at the motor terminals of the lens mechanism. Furthermore you need a brush to clean the camera before and while disassembling. You can use compressed air in hard to reach places.
Lens-gear-box
Repair/Replacement
In most cases you have to undo the screws and remove the back cover, the LCD screen and perhaps a circuit board or two. Once you have access to the screw which hold the lens inside the housing, undo them, disconnect all cables and flexible circuit boards and remove the whole lens assembly including CCD and gear box at the side. With just the lens assy in front of you, remove the screws and cover of the gear box. Take out any dirty gears and clean all the teeth with a brush or compressed air. Now assemble the gearbox and apply 3-5V from your variable power supply at the terminals of the motor. Once the lens extends and retracts smoothly, you can start assembling the camera in reverse order. If not you may want to repeat the cleaning procedure again. After the cleaning the lens should work fully in and out even with lower voltage without any stopping.
After you assembled the camera check it in all functions.
Good luck and great success with your lens repair.
If your camera needs a lens repair or has a fault is not listed and you need advice with your particular camera issue click on the logo below.
For free repair estimates

- Fast Free workshop Estimate
- Australia–wide send in service
- ALL BRANDS, Video & Photo
- Professional & Domestic equipment
- Very competitive rates
- 6 month warranty on repairs
- 24/7 online job tracking
- Technician advice

by admin | Feb 21, 2011 | DIY Repairs
DIY Lens Repair Procedure
Symptom - Lens shutter doesn’t open and/or lens doesn’t extend or retract. In addition the display shows an error message and the camera makes a beep noise.
Caution - This camera repair applies only to sand and dirt damaged cameras. Impact damaged cameras usually require a whole lens replacement, which is most likely an uneconomical repair.
In most cases it is sand grains and dirt inside the gearbox, which drives the lens segments in and out. In order to clean the lens and gearbox the whole lens assembly needs to be pulled out of the camera.
To drive the lens motor manually, we use a variable power supply at the motor terminals of the lens mechanism. Furthermore you need a brush to clean the camera before and while disassembling. You can use compressed air in hard to reach places.
Camera Repair/Part Replacement
In most cases you have to undo the screws and remove the back cover, the LCD screen and perhaps a circuit board or two. Once you have access to the screw which hold the lens inside the housing, undo them, disconnect all cables and flexible circuit boards and remove the whole lens assembly including CCD and gear box at the side. With just the lens assy in front of you, remove the screws and cover of the gear box. Take out any dirty gears and clean all the teeth with a brush or compressed air. Now assemble the gearbox and apply 3-5V from your variable power supply at the terminals of the motor. Once the lens extends and retracts smoothly, you can start assembling the camera in reverse order. If not you may want to repeat the cleaning procedure again. After the cleaning the lens should work fully in and out even with lower voltage without any stopping.
After you assembled the camera check it in all functions.
Good luck and great success.
Dismantled gear box without cogs
To avoid any damage and self induced faults, check out our Camera Care Video.
For more technical knowledge about camcorders I recommend THE Camcorder Handbook, or the Camcorder Technology Course
If your camera fault is not listed or you need advice with your particular camera issue go here.
For free repair estimates

- Fast Free workshop Estimate
- Australia–wide send in service
- ALL BRANDS, Video & Photo
- Professional & Domestic equipment
- Very competitive rates
- 6 month warranty on repairs
- 24/7 online job tracking
- Technician advice


 Online Repair Estimate

 Facebook
 LinkedIn